Tag Archives: sql server

TM1: Run SQL Server Job from TI process

TI_sql_job_image

TM1 Turbo Integrator is quite limited when it comes to loading data from different sources and transforming and cleaning the data before it can be loaded to cubes. Therefore you might have a dedicated data repository for your TM1 solution for example a data warehouse. Sometimes you need to refresh the DW data before it can be loaded to your TM1 solution. Then you face the question: how to manually execute data warehouse refresh ETL jobs? Of course you can always use SQL Server Management Studio and run the jobs there but if there is a need for the end users to manually refresh the data during working hours it would be nice to provide them a single-platform solution do accomplish this.

So lets face it: maybe you already have some user interface for the end-users to execute some TM1 solution’s internal TI-processes. It could be via TM1 Perspectives web sheets on TM1Web,  straight from TM1 Architect etc. Wouldn’t it be nice to have the ability to run external DW loading processes from the same place? Here is how to accomplish it.

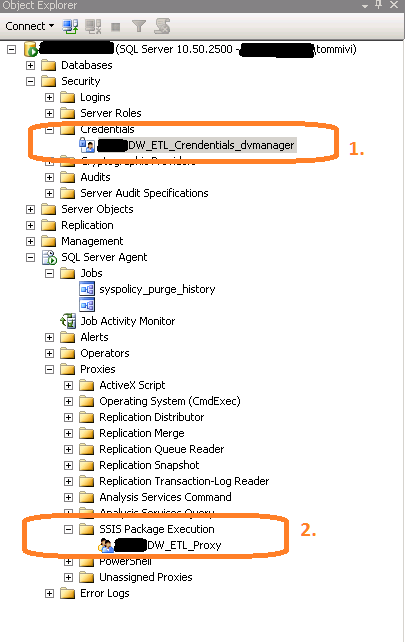
Set up the logins and jobs in SQL Server

TI_sql_job_image_login_properties

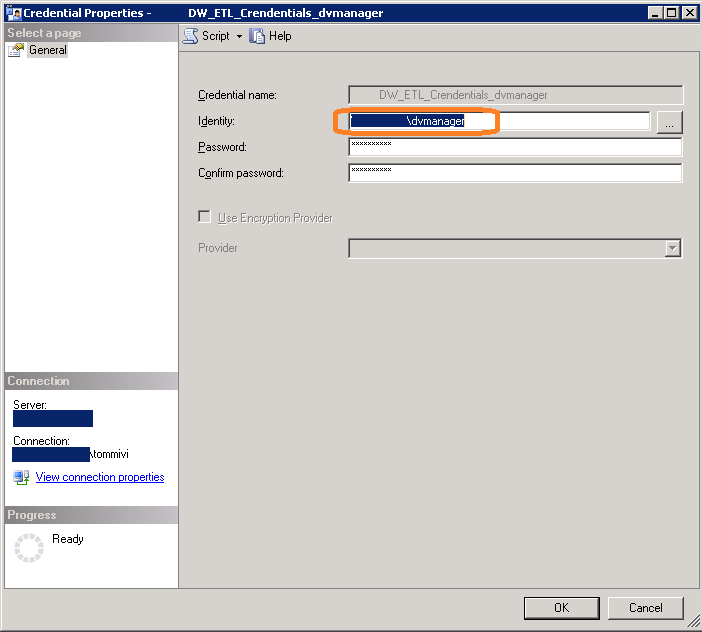
First of all you need to ensure that the user account that will be used when from TI process connects SQL Server has all the needed permissions in the SQL Server instance. At least the three following things must be ensured:

  • Login has SQLAgentUserRole checked in the msdb database. Then the login will have permissions on only local jobs and job schedules that it owns
  • Login has the required permissions to access the source files etc. That can be solved by defining a proxy account and I have described it in my previous blog post.
  • The job must be owned by the same user you will use when connecting from TM1. This is because we don’t want to throw admin permissions around and we want the user to have only rights to one or couple of jobs not all of them


Set up TI process to run the job: zSQLJob_StartJob

To accomplish we need two different TI processes: one to actually execute the job and one to determine whether the job execution has ended or not. Let’s start with the main process zSQLJob_StartJob. It has one parameter p_sql_job_name which will contain the name of the job that will be executed. The process itself is quite straightforward and here is the complete code:

TI_sql_job_image_zsqljob_start

What it does is basically just opens the ODBC connection to the msdb database of the SQL Server instance and then executes the job. The magic here is that the process won’t finish until the job on SQL Server has finished. To have this functionality we need to poll the msdb database every 5 seconds and find out if the job has finished or not.

Set up TI process to determine the status of the running job: zSQLJob_CheckJobStatus

To find out whether the job has finished or not we just query the job status directly from the msdb database. To do that we use the following SQL query and put it in the “Data Source” tab like this:


SELECT CASE
WHEN EXISTS (
select job.Name, job.job_ID, job.Originating_Server,
activity.run_requested_Date, datediff(minute, activity.run_requested_Date, getdate()) as Elapsed
from msdb.dbo.sysjobs_view job
inner join msdb.dbo.sysjobactivity activity
on (job.job_id = activity.job_id)
where run_Requested_date is not null and stop_execution_date is null
and job.name = 'JOHIDW_Update_Publishing' ) THEN 1 ELSE 0 END AS JOB_RUNNING_STATE

TI_sql_job_image_zsqljob_checkstatus_datasource

The only magic with this process is to save the single result value to the global variable vnJOBSTATE_global that we defined in the previous master process. If the value is 1 it means that the job is still running and the master process keeps polling the msdb database every 5 seconds. When the job finishes the value turns to 0 and the master process can finish as well.

Conclusion

There may be times when you need to execute SQL Server jobs to make sure your data to be loaded to TM1 is up-to-date. With this example you can do a nice and easy integration between TM1 and SQL Server and allow end-users to execute simple SQL Server jobs if needed.

Advertisement

SQL Server 2012 Integration Services DLL Hell: Microsoft Visual Studio Tools for Applications Runtime 3.0

One of the major drawbacks of the SQL Server Integration Services (SSIS) is the mixture of 32bit and 64bit environments:

  • Design & development time environment (SQL Server Data Tools) is running in 32bit though you can debug the package in 64bit mode
  • Production packages can be run in 32bit or 64bit whatever you choose in the package properties

Well, there are moments when this arrangement feels like a gift from god but for me it was once again a real pain in the ass. I was recently working in a fresh installation of SQL Server 2012 and Data Tools. When I was trying to edit a Script Task in my SSIS package I faced the following error message:

Could not load file or assembly ‘Microsoft.VisualStudio.Tools.Applications.Core

Fresh installation and everything seems like to be in order but no, the script editor won’t open up. After investigation I found out that when the moon and the stars are aligned perfectly there is a small possibility that you miss one assembly file if the installation of SQL Server and related components is done in the wrong order. The thing is that to be able to run the package in both 32bit and 64bit there has to be same assemblies respectively: ones for 32bit and the others for 64bit. My problem was that I was missing the 32bit version of Microsoft.VisualStudio.Tools.Applications.Core.

From the “Add / Remove Applications” of Windows I noticed that yes, I have the Microsoft Visual Studio Tools for Applications x64 Runtime 3.0 but what i was missing was the x32 version of the assembly. So grabbing the MSI installer file from the installation media (redist/VSTA/runtime/x86/VSTA_RT30.msi) and installing it fixed the problem.

Beware of DLL hell!


SQL Server 2014 CTP1 In-memory OLTP issues with VirtualBox

I just started getting touch to the brand new SQL Server 2014 with my VirtualBox virtual machine. The first thing to to with SQL Server 2014 is to test out the new in-memory OLTP functionality (of course!). So I did and immediately faced challenges. I followed the SQL Server team blog instructions and noticed that “MEMORY OPTIMIZED DATA” -section in Filegroup properties was missing completely. I tried to run the scripts provided and then got this error message:

Msg 41342, Level 15, State 1, Line 5

The model of the processor on the system does not support creating filegroups with MEMORY_OPTIMIZED_DATA. This error typically occurs with older processors. See SQL Server Books Online for information on supported models.

Looks like I wasn’t the only one around having the same issue because it had to to something with VirtualBox default settings for a new virtual machine. So, if you want to get the new in-memory OLTP functionality working correctly with VirtualBox you need to run the following command with VBoxManage:

VBoxManage setextradata [vmname] VBoxInternal/CPUM/CMPXCHG16B 1


SSIS: Adding timestamp into filename

Once and a while you need to “post process” your source files for example moving them into archive directory etc. In such directory you might then end up having dozens of files so you need to rename them also. The most common way to achieve a robust and clear formula of renaming files is to add a timestamp inside the filename.

In SSIS (SQL Server Integration Services) there is no sophisticated way (read: nice string/date function) to do this but leveraging expressions and string manipulating functions you can have a nice one like the one I’ve used:

(DT_WSTR, 4) (DATEPART( "yyyy", @[System::StartTime]  )) +
RIGHT("0" + (DT_WSTR, 2) (DATEPART( "mm", @[System::StartTime]  )), 2) +
RIGHT("0" + (DT_WSTR, 2) (DATEPART( "dd", @[System::StartTime]  )), 2) +
"_" +
RIGHT("0" + (DT_WSTR, 2) (DATEPART( "Hh", @[System::StartTime]  )), 2) +
RIGHT("0" + (DT_WSTR, 2) (DATEPART( "mi", @[System::StartTime]  )), 2) +
RIGHT("0" + (DT_WSTR, 2) (DATEPART( "ss", @[System::StartTime]  )), 2)

Now, just add this expression as a pre- or postfix to your processed file and you end up with a nice and clean result like: sourcefile_20130412_082024.csv


RSAAD – “Reporting Services as a Dashboard”

Some might think that the SQL Server Reporting Services (SSRS) is only for creating static and standardized reports with simple charts like the following picture describes:

This can be the most common feeling about SSRS but I can tell you that is not the case. Thanks to the acquisition of Dundas chart components SSRS has to provide fully parametrized, nice-looking and fresh Gauge panels and other chart components that can be used to create dashboards without making investments to platforms such as SharePoint PerformancePoint Services as they can be used straight from the Reporting Services portal just like any other report. Here is one example from my projects, a weather conditions dashboard made with SSRS:

Weather conditions dashboard made with SSRS

Weather conditions dashboard made with SSRS

Once in a while you hear business deciders struggling with how they want to have some simple dashboards where they can see in one glance how the business is performing. The problem often is that people think that they need to make (big?) investments in a specific dashboard tools or bigger platforms that provide the dashboard capabilities. That is not the case because with the latest SSRS Gauge panels and charts you can provide fresh insights to your data and have the dashboard look-and-feel. They can also be easily integrated to existing sites and portals.

SSRS Gauges collection

SSRS Gauges collection

I’m not telling you to get rid of or totally ignore products like SharePoint PerformancePoint Services etc. but often you can also get nice results without them. So, next time when you hear someone telling you about how one needs to invest lots of money to get dashboard capabilities you should first see what SSRS has to offer and see if it already fits to his needs.


Master Data Services 2012 is a must – Huge productivity improvements

Compared to the 2008R2 version you can now save even 75% of development time.

Microsoft just released the new SQL Server 2012 version. There are lots of new features included but one major improvement deals with Master Data Services (MDS) application. It has now moved to its second major release and it is now shipped with SQL Server 2012 Enterprise and Business Intelligence licenses. I don’t go into details that much but what I want to point out here is that the new 2012 version of MDS has remarkable improvements when it comes to user experience and the productivity of development work.

Biggest and maybe the most important improvement is the new Excel-add-in that can be used to modify data but also to create new entities and to import new data from scratch. Where the 2008R2 version relies only on the (clumsy) database staging tables in 2012 one can now use Excel to import batches of new data. This is of course good news for new users that are already familiar with Excel. The second big improvement is the new Silverlight-based web user interface. It has been completely renewed and I can tell that now it is really ready for end users. Unfortunately the initial 2008R2 version still suffers from nasty bugs and the usability is quite poor.

What I will now show you is a comparison between MDS2008R2 and MDS2012 and how they differ from each other when importing new data and creating entities.

Creating new entities and importing data

Let’s face it: I have a simple Product – structure that  grabbed from the Adventureworks – sample database. 5 entities stored in separate csv-files:

  • ProductCategory
  • ProductSubCategory
  • ProductModel
  • Color
  • Product

What we will next do is

  • Create a new Model to store the entities
  • Create 5 entities and the corresponding attributes + relationships: Product – SubCategory – Category, Product – Color and Product – ProductModel
  • Import data into entities
  • Create a derived hierarchy ProductCategory – ProductSubCategory – Product

Master Data Services 2008 R2

Create entities manually

In the old version we have to do it the hard way: first create the new entities in the web UI and then import the data via database staging tables using a proper ETL tool. I preffered SSIS.

This phase took me approximately 6 minutes to complete. Now I have the entities structure ready in MDS so it’s time to import some data.

Import data by using SSIS and the MDS staging tables

This is the most time-consuming part of the process. You have to create separate data flows for each entity and you also must do some unpivoting of the data when importing entity attributes. After each data flow you must go into the Import/Export  – page in the web UI and start the importing process manually. (OK, you can do all this automatically by using the web service calls and all that stuff but this approach is still the fastest way at this point).

Importing the attributes for each entity is bit tricky as you need to unpivot the source data into separate rows.

After a while and some serious SSIS-work we have 5 entities and a nice Product hierarchy set up in MDS:

The bad thing is that it took almost ~ 30 minutes to accomplish all this. With all the work that you have to do in the MDS Web UI we end up with appoximately total 40 minutes of work.

Master Data Services 2012

Create entities and import data

Now we’re talking. With MDS2012 you don’t actually have to separate the creating entities and importing data phases because now you can do them both at the same time! Starting with ProductCategory entity we just import the csv data into our Excel sheet and then connect to the MDS server and hit the Create Entity – button on the MDS ribbon.

Then we just choose right columns for code and name usage and we’re ready. As easy as that !

Handle domain-based attributes

The first thing that came to my mind when hearing about the new Excel-add-in was that if it was capable of dealing with domain-based attributes. And guess what, it sure is. Like we did with ProductCategory entity we do the same for ProductSubCategory. Notice here that there is a relation between SubCategory and Category and we have to handle it also correctly. That can be managed by using the Attribute Properties – functionality in the MDS ribbon.

Choose Constrained list (Domain-based) as the attribute type and populate values straight from the recently created ProductCategory entity:

Nice and easy! We now have succesfully created ProductCategory and ProductSubCategory entities and formed a relationship between. All this in ~ 3 minutes of time. After repeating the same steps for the rest of the entities (ProductModel, Color and Product) we end up with the same result as in 2008R2 but only in 10 minutes of development time. Saving 75% of time compared to the process in MDS2008R2.


MDS 2008R2 MDS 2012
Create model 1 min 1 min
Create entities 6 min
Import data 30 min 10 min
Other 4 min
Total 41 min 11 min

Extra mentions about MDS2012

When talking about how to automate data imports that’s where the staging tables are coming into picture also in MDS 2012. Now it’s also more user friendly since you don’t have to import entity rows and corresponding attributes in separate tables and you don’t have to unpivot the columns into rows in the tblStgAttributes – table. In MDS2012 there is a separate table for each entity and it is 1:1 with the entity definition.

What really completes the whole package is the also brand new Data Quality Services (DQS) application that works nicely together with MDS. More about DQS later …

Summary

When Microsoft launched the initial version of MDS in May 2010 it was a classic “first version” of the (recently acquired)  product: missing features and minor bugs here and there. Now the second major release really finds its place in the hearts of the users and developers since there are lots of really good improvements that make it a better product.

So, if you are planning to start a fresh MDS project my honest advice is: don’t start start with 2008R2, do it with SQL Server 2012.

-GD